

A brown ring shows up on the ceiling. Maybe you hear a slow tick… tick during a storm. Your first instinct is to grab a ladder and start hunting around on the shingles — and that’s usually the wrong move. Learning how to find a roof leak the right way starts inside your house, not on the roof. Water is sneaky. The spot where it drips onto your ceiling is almost never directly below the spot where it snuck through the roof.
That single fact trips up more homeowners than anything else. You patch the shingles right above the stain, feel good about it, and then the ceiling gets wet again after the next rain. The leak was never there to begin with.
This guide walks you through a calmer, more reliable way to track a leak down — one that roofers and home inspectors actually use. You’ll start with a quick gut check to confirm it’s even a roof problem, then follow the water uphill through three zones until you’re standing over the real entry point. No guessing. No wasted afternoons soaking the wrong section of roof.
First, Confirm It’s Actually the Roof
Here’s something most articles skip entirely: a fair number of “roof leaks” aren’t roof leaks at all. Before you climb anywhere, rule out the impostors. It takes ten minutes and can save you a whole weekend.
Run the water through this filter:
- Does the stain only appear or grow after rain or snowmelt? That points strongly to the roof. A dry-weather leak usually isn’t.
- Is the wet spot near a bathroom, kitchen, or a wall with pipes running through it? Could be plumbing — a supply line, a drain, or a failed seal — not the roof.
- Does it show up on cold mornings with no rain, especially in winter? That’s often condensation, not a leak. Warm indoor air hits cold roof sheathing, forms frost, and drips when it thaws. People swear their roof is leaking when the real problem is attic ventilation.
- Is there an AC unit or ductwork above the ceiling? A clogged condensate drain pan can mimic a roof leak perfectly, and it only “leaks” when the system runs.
If the moisture tracks with rainfall, you’re dealing with a roof leak and the rest of this guide is for you. If it shows up in dry weather or lines up with plumbing or the AC, pause and check those systems first. Chasing a plumbing leak up onto your roof is a genuinely miserable way to spend a Saturday.
A quick trick to confirm: draw a pencil line around the edge of the stain and note the date. If it spreads after the next rain, the roof is the culprit. If it grows on a dry day, look elsewhere.
Why Roof Leaks Are So Hard to Pin Down
Water follows the path of least resistance, and inside a roof assembly that path is rarely a straight line down. Rain enters at a gap — a cracked flashing joint, a lifted shingle, a failed pipe boot — then runs along the underside of the roof decking. It travels down rafters, soaks into insulation, and rides framing sideways until it finds a low point or a seam to drop through.
By the time it stains your ceiling, it may have traveled several feet horizontally from where it got in. A leak at the chimney can surface as a spot in a bedroom on the other side of the room with nothing above it. This is exactly why patching “right above the stain” fails so often.
So the whole game is reverse-engineering that path. You find where the water lands, then follow the trail uphill to where it entered. Water runs downward, always, which means the entry point is guaranteed to be higher than the drip. That one rule does most of the heavy lifting.
The Three-Zone Method: Follow the Water Up
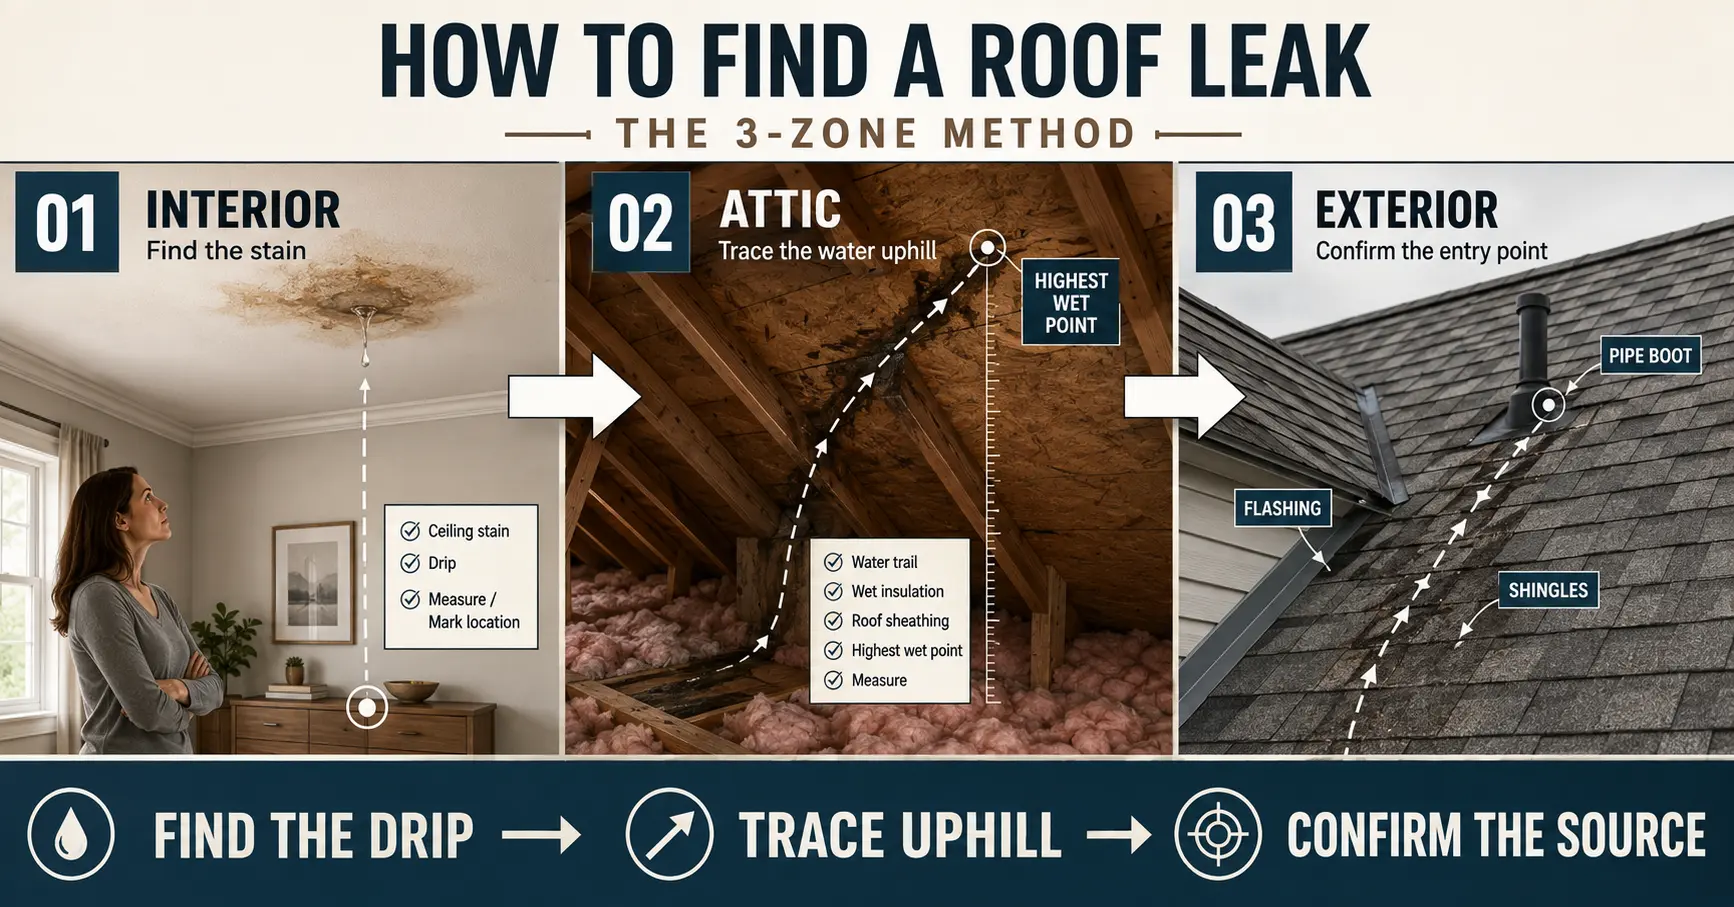
Instead of random hunting, work through three zones in order — interior, attic, exterior. Each zone narrows the search area for the next. By the time you get on the roof (if you even need to), you’ll know within a couple feet where to look.
Zone 1: Read the Interior Clues
Start where you first noticed the problem. The stain, drip, or smell is your entry ticket, but it also carries information if you know how to read it.
What the stain is telling you:
- A fresh, dark, wet ring means an active leak that’s happening now or happened very recently.
- A dry brown ring with a crisp edge is older — water came, sat, and dried out.
- Concentric rings, a ring inside a ring inside a ring, mean the leak has been filling and drying repeatedly over a long stretch. That’s not a new problem; that’s months, maybe years.
- A yellowish or rust-tinted stain often means the water picked up minerals or touched a nail on the way down.
Beyond the ceiling, walk the room and look for:
- Peeling or bubbling paint (moisture trapped behind the surface)
- Warped or spongy drywall
- Dark patches in corners or along the ceiling-to-wall line
- A musty, persistent smell even when nothing looks wet
That smell matters more than people think. Mold and mildew feed on trapped moisture, and according to the CDC’s guidance on dampness and mold, damp indoor spaces are linked to respiratory symptoms and can worsen asthma in sensitive people. A musty upstairs room with no visible stain usually means water has been collecting in the attic for weeks before it ever shows on your ceiling. Don’t wait for the drip.
Note the exact location of every clue — which room, which corner, how far from the exterior wall. You’ll carry those coordinates up into the attic next.
Zone 2: Trace the Trail in the Attic
The attic is where most leaks actually reveal themselves, because you’re now looking at the underside of the roof — the surface the water travels along. Bring a bright flashlight, wear a dust mask, and step only on the joists or laid boards. Never on the insulation or drywall between joists; you’ll put your foot through the ceiling.
Position yourself roughly above where you saw the interior stain, then look up and around for:
- Dark streaks or water trails running down the rafters and roof sheathing
- Wet, matted, or discolored insulation (it deteriorates faster and more visibly than wood, which makes it a useful flag)
- Black or gray mold patches on the wood
- Rusted or shiny nail tips poking through the decking — condensation and leaks both collect here
- Soft, dark, or crumbling wood, a sign of long-term saturation
Once you spot a trail, follow it uphill to its highest wet point. That highest point is your best clue — the entry hole is at or just above it. As Bob Vila’s team notes in their walkthrough on tracing a roof leak, insulation can divert water sideways, so the damaged patch you find may sit a few feet from the actual entry. Keep following the wettest, highest trail rather than stopping at the first damp spot.
The daylight test. On a bright day, turn off your flashlight and let your eyes adjust. Any pinpricks of daylight coming through the roof deck are holes — mark each one with a piece of tape or a dab of chalk. They may not all be the active leak, but every one is a place water can get in.
Measure before you climb. This is the step that separates a clean find from an afternoon of frustration. Once you’ve located the highest wet point or a daylight hole, measure it: distance down from the roof peak, and distance over from the nearest gable end or a fixed reference like a vent pipe. Write those two numbers down. When you get on the roof, you’ll transfer them to the exterior and land right on target instead of eyeballing it.
Zone 3: Confirm From the Exterior
Now — and only now — you look at the roof itself. If you can get the answer with binoculars from the ground, do that first. Climbing onto a roof carries real fall risk, and a steep or wet roof is a job for a pro, full stop.
Head to the coordinates you measured from the attic and inspect the usual suspects. Roof leaks concentrate around penetrations — anywhere something interrupts the smooth run of shingles — far more than in the open field of the roof. Check, in rough order of likelihood:
- Flashing around chimneys, walls, and dormers — bent, lifted, rusted, or with cracked sealant
- Pipe boots and vent collars — the rubber gaskets around plumbing vents crack and split with age; this is one of the most common leaks of all
- Skylights — seals and flashing fail over time
- Roof valleys — where two slopes meet and channel a lot of water
- Missing, cracked, curled, or lifted shingles, especially after a windstorm
- Exposed or backed-out nails and popped fasteners
- The gutter line and roof edge — clogged gutters and ice dams push water backward under the shingles
Match what you find on the exterior to the attic evidence. When the damaged flashing or split boot lines up with your measured entry point, you’ve found it.
When You Can’t Find It: The Hose Test
Some leaks refuse to show themselves on a dry day — a hairline crack that only opens under a driving rain, or a wind-driven leak that needs water hitting from a certain angle. When the visual hunt comes up empty, the hose test is the most reliable DIY method there is.
You need two people and some patience. Here’s the process, which mirrors the approach This Old House recommends for elusive leaks:
- One person goes into the attic with a flashlight, positioned over the suspected area. The other takes a garden hose up to the roof (or aims it from a ladder if the roof isn’t safe to walk).
- Start low. Soak the roof just above where the interior stain appears — the lowest point of your suspect zone. Never start at the top. If you flood the whole roof at once, you’ll never know which section actually leaked.
- Run water over a small two- to three-foot section for several minutes. Use a spray pattern that mimics real rain, not a pressure blast.
- The attic person watches and listens for the first drip, then calls out the moment water appears.
- If nothing shows, move up the slope in small increments — low to high, one section at a time — isolating each penetration until the drip finally appears.
It’s slow. A thorough hose test can take an hour or more. But it pinpoints leaks that visual inspection alone will miss every time, and it confirms the source before you spend a dime on repairs. The Home Depot guide to the water test makes the same point about working around one penetration at a time — patience beats speed here.
Leak Detective: Match the Symptom to the Source
Sometimes the clue you have points you straight to a likely cause. Use this reverse lookup to shortcut the search — it tells you where to aim before you even get in the attic.
| What you’re seeing | Most likely source |
|---|---|
| Stain near the chimney | Chimney flashing or cricket failure |
| Ceiling stain in the middle of a room, no fixtures above | Cracked pipe boot or a nail-pop higher up the slope |
| Stain along a ceiling-to-wall corner | Step flashing or a missing kickout flashing |
| Water only during hard, wind-driven rain | Lifted shingles or failed underlayment |
| Leak that appears only when snow melts | Ice dam at the eaves |
| Stains around a skylight | Skylight seal or flashing |
| Ring around a ceiling light or fan | Water tracking along wiring to the fixture |
| Multiple stains across a wide area | Aging roof or widespread underlayment failure |
This isn’t a diagnosis you can bank on without confirming — water travels, remember — but it’s a smart place to point your flashlight first.
Season Matters: Leaks That Only Show Up in Certain Weather
Not every leak behaves the same year-round, and knowing the season can tell you a lot.
Winter — ice dams. In cold climates, heat escaping into the attic melts snow on the upper roof. That meltwater runs down to the cold eaves and refreezes into a ridge of ice. Water backs up behind the dam, pools, and works its way under the shingles. These leaks appear during thaws, not during the storm itself, and they show up near the eaves and exterior walls. The fix is as much about attic insulation and ventilation as it is about the roof.
Storm season — wind-driven rain. A roof that stays dry in a gentle shower can leak in a sideways downpour. Wind pushes water up and under shingles and into gaps that vertical rain never reaches. If your leak only shows during big storms, look for lifted shingles and marginal flashing.
Summer — the sneaky dry-weather dripper. Long, hot spells can dry out and shrink old sealant and rubber boots, opening cracks that then leak the moment the next rain hits. A leak that suddenly appears after a heat wave often traces back to a hardened, split pipe boot.
Spring and fall — clogged gutters. Leaves and debris back water up at the roof edge, where it can seep behind fascia and under the bottom course of shingles. If your leak lives near the edge of the roof, clean the gutters before you blame the shingles.
DIY or Call a Pro? The Honest Line
Finding a leak and fixing one are two different skill levels. Plenty of homeowners can locate a leak using the three-zone method. Fewer should be walking a steep roof to repair it.
Handle it yourself when:
- The leak source is a clearly visible, reachable problem (a split pipe boot, an obvious lifted shingle) on a low-slope, walkable roof
- You can safely access the attic and the exterior
- The damage is small and recent
Call a professional when:
- You’ve done the interior and attic inspection and still can’t locate the source
- The roof is steep, tall, wet, or otherwise unsafe to walk
- You’re seeing multiple leaks, widespread staining, or soft decking (a sign of structural rot) — at that point, what a full roof replacement costs is worth knowing, because patching leak after leak on a worn-out roof rarely pencils out
- You need documentation for an insurance claim — a pro’s written report supports a claim in a way a DIY look never can
There’s a health angle here too. The CDC makes the point that finding and correcting the moisture source matters more than testing the air, because it’s the ongoing dampness that drives mold and the health problems that come with it. If you smell mold and can’t find the leak, that’s a reason to bring someone in sooner rather than later.
What Detection and Repair Actually Cost
Locating a leak is often bundled into an inspection or the repair itself. Here’s a realistic 2026 picture based on national data.
| Service | Typical cost (2026) |
|---|---|
| Professional roof inspection | $125–$350 |
| Basic leak repair (pipe boot, small flashing) | $150–$400 |
| Typical single roof leak repair | $360–$1,550 |
| Ice dam removal | ~$1,200 |
| Major leak with decking damage | $3,000–$6,000+ |
Want a ballpark tailored to your own roof before you call anyone? Plug your details into our roof cost calculator for a quick estimate you can hold up against the quotes you get.
According to Angi’s 2026 roof leak repair cost data, most single-leak repairs land between $360 and $1,550, with the national average sitting near $1,172 once you blend the quick pipe-boot swaps with the big valley rebuilds. The takeaway that matters most: acting within a day or two of finding a leak keeps you at the low end of that range. Wait, and you’re paying to fix drywall, insulation, and mold on top of the roof — which can easily triple the bill.
Once you know what’s leaking and where, our full breakdown of roof leak repair costs by leak type shows what each fix — pipe boot, flashing, valley, decking — actually runs, so you can sanity-check a contractor’s quote before you sign it.
Practical Tips That Save You Time
A few things worth knowing before you start:
- Keep a bucket and towels ready the moment you spot an active drip. Containing the water protects your floors and ceiling while you investigate — and if it’s pouring in mid-storm, walk through what to do during an active roof leak before it soaks the ceiling further.
- If water is pooling in a bulging ceiling, poke a small hole at the lowest point of the bulge to drain it into a bucket. A controlled drain beats a collapsed ceiling.
- Photograph everything — the stain, the attic trails, the exterior damage. You’ll want the record for a contractor or an insurance claim.
- Don’t reseal blindly. Smearing caulk over a spot that isn’t the source just hides the problem and complicates the real repair later.
- Check the whole penetration, not just the obvious crack. Flashing can fail on the uphill side where you can’t see it from the ground.
- Time your attic inspection right after rain if you can. Everything is still wet and the trails are easiest to read.
Frequently Asked Questions
Why is the leak in my ceiling not directly under the damage on my roof?
Because water rarely drops straight down inside a roof. It enters at a gap, runs along the underside of the decking and down the rafters, soaks through insulation, and finally drips wherever it finds a low point or a seam. That drip can land several feet from where the water actually got in. Always trace the trail uphill from the stain to find the true entry point.
Can I find a roof leak without going into the attic?
Sometimes, but it’s harder and less accurate. The attic gives you a direct view of the roof’s underside, where water leaves visible trails. If you can’t safely access the attic, you can inspect the exterior with binoculars and run a hose test with a helper watching inside, but expect the search to take longer and be less precise.
How can I tell if it’s a roof leak or condensation?
Timing is the tell. A roof leak appears or worsens after rain or snowmelt. Condensation shows up on cold, dry mornings — often in winter — when warm indoor air meets cold roof sheathing and drips as it thaws. If your “leak” happens without any precipitation and comes with frost on the nail tips in the attic, you likely have a ventilation and condensation problem, not a roof hole.
What’s the fastest way to find a roof leak?
Start inside and work outward. Read the interior stain, go into the attic and follow the wettest trail to its highest point, measure that spot, then transfer the measurement to the exterior. This three-zone approach almost always beats climbing onto the roof and hunting at random, because interior clues shrink the search area before you ever touch a ladder.
Should I use a hose to find my roof leak?
Yes, when the visual inspection comes up empty. The hose test is the most reliable DIY method for hidden or weather-dependent leaks. Have one person watch in the attic while another sprays water on the roof, starting low and moving up one small section at a time. It’s slow but it pinpoints leaks that dry-weather inspection misses.
How much does it cost to have a professional find a roof leak?
A professional roof inspection typically runs $125 to $350, and leak detection is often folded into that fee or into the repair itself. If the leak turns out to be a simple fix like a cracked pipe boot, repairs can start around $150, while the average single-leak repair runs closer to the $360 to $1,550 range depending on the roof and the damage.
Is a roof leak an emergency?
An active drip during rain needs same-day attention to contain the water, but the roof repair itself can usually wait for dry, safe conditions. What you shouldn’t do is ignore it. A slow leak quietly rots decking and grows mold long before it becomes obvious, and those hidden costs dwarf the price of an early fix.
Quick Recap: Your Leak-Finding Playbook
Run the confirmation filter first — if the moisture tracks with rain, it’s the roof; if it shows up dry or near plumbing, look there instead. Then follow the water up through three zones: read the interior stain for age and location, trace the trail in the attic to its highest wet point and measure it, and confirm on the exterior at the penetrations where leaks concentrate. When the trail goes cold, the two-person hose test — always starting low and moving up — will flush out the stubborn ones.
Move fast once you find it. A leak caught this week is a cheap fix; the same leak caught next season is drywall, insulation, and mold on top of the roof work. Know your limit, too — locating a leak is well within reach for most homeowners, but a steep roof, widespread damage, or a source you just can’t find is your cue to bring in a pro before the water does more damage than the repair ever would. And if the leaks keep coming and the roof is near the end of its life, it may be time to stop patching and compare a fresh start — our look at metal roofing versus shingles breaks down which one actually pays off over the long haul.
Sources
- CDC / NIOSH — Mold and Dampness Health Problems
- This Old House — How to Find and Fix a Roof Leak
- Bob Vila — How to Find a Roof Leak
- Home Depot — How to Fix a Leaky Roof (Water Test)
- Angi — Cost to Repair a Roof Leak, 2026 Data

Baldeep builds and researches content sites full time. For ReadLikePro he
compiles home service pricing from contractor quotes, industry cost surveys,
and public data, then checks the numbers against more than one source before
publishing. He isn’t a licensed contractor, so every estimate here is a
research-backed range, not a quote for your specific job.